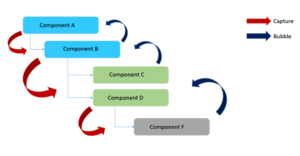
In the realm of Lightning Web Components (LWC), there are two key phases of event propagation: the Bubble Phase and the Capture Phase. The Bubble Phase refers to the upward movement of events through the component hierarchy, from child to parent components. On the other hand, the Capture Phase, which is less commonly used in event handling, pertains to the downward propagation of events, from parent to child components.

Visualizing Event Propagation: The Journey of Events in LWC
To better understand these concepts, imagine a diagram where the red arrow symbolizes the Capture Phase, illustrating the downward flow of events through the components. Conversely, the blue arrow signifies the Bubble Phase, representing the upward movement of events through the component hierarchy.
Delving Deeper: An In-Depth Discussion on Event Handling in LWC
As we delve deeper into this article, we’ll explore more about how event handling in LWC operates through the Bubble and Capture phases. We’ll discuss their significance, use cases, and the nuances that differentiate them. Stay tuned for an enlightening journey into the heart of event propagation in LWC.
Exploring Event Propagation: A Look at Bubbles and Composed in LWC
When we talk about an event ‘bubbling up’, we’re referring to the flow of communication from a child component to its parent and then to its grandparent. This creates a tree-like structure, with the child component at the base dispatching events upwards through the component tree.
To fully grasp how bubbling works, it’s essential to first understand the concept of the Shadow DOM.
The Shadow DOM: An Overview
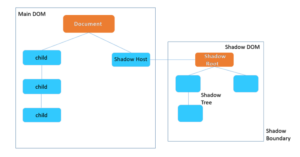
The Shadow DOM is a crucial aspect of every Web Component DOM, encapsulating it in a way that makes it invisible and inaccessible to other components. Its primary function is to isolate components for encapsulation and rendering.
The Shadow DOM isn’t an exact replica of the DOM. Instead, it adds a subtree of DOM elements to a component’s rendering without incorporating it into the main component’s DOM tree.
Whether it’s viewed as a Light DOM or a Shadow DOM largely depends on perspective. From the viewpoint of separate components, it’s considered a Light DOM, with outside components unable to view or access it. From its own JavaScript class’s perspective, it’s seen as a Shadow DOM.
Encapsulation safeguards the elements from manipulation by HTML, CSS, and JavaScript. Thanks to the Shadow DOM, one Lightning component remains unaffected by other Lightning components.
Key Elements of the Shadow DOM
The Shadow DOM comprises several key components:
- Encapsulation: This feature encapsulates the HTML, CSS, and JavaScript code within a boundary, preventing it from being manipulated by the rest of the components and vice versa.
- Shadow Tree: Within Lightning Web Components, the Shadow DOM generates a hidden DOM tree with its own structure, behavior, and style, known as a ‘shadow tree’. It differs from the main DOM tree.
- Shadow Root: This is the topmost node of the Shadow tree and serves as a separator for the Shadow DOM and the regular or light DOM.
- Shadow Boundary: This is the dividing line between the Shadow DOM and the outer DOM. It marks the end of the Shadow DOM and the beginning of the Light DOM. It prevents the CSS styles, internal structures, and behavior of a component from escaping to the outer components, thereby creating encapsulation.

Crafting Custom Events: A Guide to Event Dispatch in LWC
In this section, we’ll explore the creation of custom events that dispatch from a child component to its parent and then to its grandparent. To craft a custom event in LWC, we utilize the ‘CustomEvent’ interface, which is built upon the foundational ‘Event’ interface.
When creating custom events, two properties come into play: ‘bubbles’ and ‘composed’. Setting the ‘bubbles’ property to true enables the component to bubble up through the DOM, although by default, this property is set to ‘false’. If the ‘composed’ property is set to ‘true’, it allows the event to traverse the ‘shadow boundary’, which is also set to ‘false’ by default.
Building Communication Bridges: Creating Lightning Components with Custom Events
Let’s now construct three simple Lightning components that establish communication among them using custom events and the ‘bubbles’ and ‘composed’ properties.
The first component, referred to as the ‘childComponent’, sits at the bottom of the hierarchy. The second component, the ‘parentComponent’, acts as the parent to the Child Component. Lastly, the ‘grandParentComponent’ serves as the grandparent to the Child component and the parent to the Parent Component. This hierarchical structure facilitates effective communication and event propagation within the component tree.

Implementing Custom Events in LWC:
A Step-by-Step Guide
Let’s dive into the process of implementing this.
Scenario 1: {bubbles: true, composed: true}
Step 1: Crafting an LWC Component Named ‘childComponent’
<template>
    <lightning-card>
        <h1>Welcome to the Child Component</h1>
        <lightning-button label="Press Here!" onclick={handleClick}></lightning-button>
        <p>{message}</p>
    </lightning-card>
</template>
In this step, we’ve incorporated a button and assigned an onclick event to it.
Step 2: Defining the JavaScript for ‘childComponent’
import { LightningElement, track } from 'lwc';

export default class childComponent extends LightningElement {
    @track message = 'Greetings from Child';

    handleClick(){
        const selectEvent = new CustomEvent("buttonclick",
        {
            bubbles : true,
            composed : true,
            detail : this.message,
        });

        this.dispatchEvent(selectEvent);
    }
}
Step 3: Constructing the ‘parentComponent’
parentComponent.html
<template>
    <lightning-card>
        <h1>Welcome to the Parent Component</h1>
        <c-child-component></c-child-component>
    </lightning-card>
</template>
Step 4: Building the ‘grandParentComponent’
grandParentComponent.html
<template>
    <lightning-card>
        <h1>Meet the Grand Parent Component</h1>
        <p>
            {messageFromChild}
        </p>
        <c-parent-component onbuttonclick={handleButtonClick}></c-parent-component>
    </lightning-card>
</template>
Step 5: Defining the JavaScript for ‘grandParentComponent’
grandParentComponent.js
import { LightningElement, track } from 'lwc';

export default class grandParentComponent extends LightningElement {
    @track messageFromChild;

    handleButtonClick(event){
        this.messageFromChild = event.detail;
    }
}
Step 6: Setting the Target for the ‘grandParentComponent’
Decide where you want to add this component. You can add the grandParentComponent to the Home Page or any other target of your choice.
grandParentComponent.js-meta.xml
<?xml version="1.0" encoding="UTF-8"?>
<LightningComponentBundle xmlns="<http://soap.sforce.com/2006/04/metadata>">
    <apiVersion>58.0</apiVersion>
    <isExposed>true</isExposed>
    <targets>
        <target>lightning__HomePage</target>
    </targets>
</LightningComponentBundle>
Step 7: Observing the Outcome
Once you click the button, the ‘messageFromChild’ value will be displayed on the GrandParent component. This message, ‘This is from Child’, originates from the child Component and reaches the GrandParent component following the steps we’ve outlined!
Scenario 2: {bubbles: true, composed: false}
In this scenario, the event bubbles up through the DOM but doesn’t cross the shadow boundary. Let’s illustrate this with an example using the same three components:
Step 1: Crafting an LWC Component Named ‘childComponent’
childComponent.html
<template>
    <lightning-card>
        <h1>Welcome to the Child Component</h1>
        <lightning-button label="Press Here!" onclick={handleClick}></lightning-button>
        <p>{message}</p>
    </lightning-card>
</template>
Step 2: Defining the JavaScript for ‘childComponent’
childComponent.js
import { LightningElement, track } from 'lwc';

export default class childComponent extends LightningElement {
    @track message = 'Greetings from Child';

    handleClick(){
        const selectEvent = new CustomEvent("buttonclick",
        {
            bubbles : true,
            composed : false,
            detail : this.message,
        });

        this.dispatchEvent(selectEvent);
    }
}
Step 3: Constructing the ‘parentComponent’
parentComponent.html
<template>
    <lightning-card>
        <h1>Welcome to the Parent Component</h1>
        <p>
            {messageFromChild}
        </p>
        <c-child-component onbuttonclick={handleButtonClick}></c-child-component>
    </lightning-card>
</template>
Step 4: Defining the JavaScript for ‘parentComponent’
parentComponent.js
import { LightningElement, track } from 'lwc';

export default class EventBubblingParent extends LightningElement {
    @track messageFromChild;

    handleButtonClick(event){
        this.messageFromChild = event.detail;
    }
}
Step 5: Building the ‘grandParentComponent’
grandParentComponent.html
<template>
    <lightning-card>
        <h1>Meet the Grand Parent Component</h1>
        <p>
            {messageFromChild}
        </p>
        <c-parent-component onbuttonclick={handleButtonClick}></c-parent-component>
    </lightning-card>
</template>
grandParentComponent.js
import { LightningElement, track } from 'lwc';

export default class grandParentComponent extends LightningElement {
    @track messageFromChild;

    handleButtonClick(event){
        this.messageFromChild = event.detail;
    }
}
Step 6: Determining the Component’s Destination
Decide where you want to place this component. You can add the grandParentComponent to the Home Page or any other target that suits your needs.
grandParentComponent.js-meta.xml
<?xml version="1.0" encoding="UTF-8"?>
<LightningComponentBundle xmlns="<http://soap.sforce.com/2006/04/metadata>">
    <apiVersion>58.0</apiVersion>
    <isExposed>true</isExposed>
    <targets>
        <target>lightning__HomePage</target>
    </targets>
</LightningComponentBundle>
Step 7: Observing the Outcome
Upon clicking the button, the ‘buttonclick’ event is dispatched from the child Component, where ‘bubbles’ is set to ‘true’ and ‘composed’ is set to ‘false’. The Parent component listens to the Event, and the message from the Child Component, i.e., ‘This is from Child’, is propagated only to the Parent Component and doesn’t reach the GrandParent because it doesn’t leave the shadow DOM. The Shadow DOM prevents the event from crossing the shadow boundary.
The ChildComponent creates a Shadow DOM of itself, which forms a shadow boundary between the Shadow DOM and the actual DOM. This boundary won’t be crossed by the event as ‘composed’ is set to ‘false’.
Conclusion
And there you have it, our comprehensive guide to ‘Event Handling in LWC through Bubble and Capture Phase’. This guide should provide you with a solid understanding of how events are handled in LWC and the role of the Bubble and Capture phases in this process.


